
GA4 Setup
Part 2 of many about GA4 and what is coming after UA
The next installments of the Analytics after UA, deals with detailed work you need to do to make sure you have access to GA4. Here is a step by step explanation of GA4 Setup:
Use the GA4 Setup Assistant to create a new GA4 property that collects data in parallel with your existing Universal Analytics property. There are no changes to your Universal Analytics property, and it continues to collect data as always. You can access both properties via the property selector or Admin screen.
Starting GA4 Setup
To use the GA4 Setup Assistant, you need the Editor role for the account.
-
-
- In Google Analytics, click Admin (lower left).

admin at the lower left hand side - In the Account column, make sure that your desired account is selected. (If you only have one Google Analytics account, it’s already selected.)
- In the Property column, select the Universal Analytics property that currently collects data for your website.
- In the Property column, click GA4 Setup Assistant. It’s the first option in the Property column.
- Click Get started under I want to create a new Google Analytics 4 property.
- In the Create a new Google Analytics 4 property pop-up screen, you’ll have one of the following options, depending on how your site is currently tagged:
- Create and continue. Click this button to continue to the Set up a Google tag page.
- Create property. If you see this option, this means that Analytics can reuse your existing Universal Analytics tagging for your GA4 property. Analytics will create a connected site tag between your Universal Analytics and GA4 properties. Select this option and skip to the Next steps with your new GA4 property section.
Note for advanced users: This option implements standard data collection for your GA4 property. If you’ve implemented any custom tags for your UA property
- On the Set up a Google tag page, select the option that best describes your situation and follow the instructions to finish creating your new GA4 property.
- In Google Analytics, click Admin (lower left).
-
Use the Google tag found on your website (Recommended)
Select this option to use the Google tag detected on your website to complete setup without making changes to your site’s code.
If desired, click Details to view your tag details.
Click Confirm to finish creating your new GA4 property.
Use a Google tag you already have
Select this option to reuse a Google tag that you already have admin access to. Click Choose a tag. You’ll see:
-
- A list of tags you have admin access to.Tag IDs
- Choose a tag labeled “On site” to complete setup without making changes to your site’s code. If you choose a tag labeled “Not detected”, you might need to install it. Select the Google tag you want to use, then click Confirm to finish creating your new GA4 property.
Install a Google tag
Select this option if you don’t have the Google tag installed on your website.
-
- Click Next to install a new Google tag on your website.
- On the Installation instructions page, you have 2 options:
- Install with a website builder: If you manage your site using certain website builders (or “CMS platforms,” like Wix or Duda), you can finish setting up your Google tag without making changes to your code.
- Install manually: Choose this option if one of the following is true:
- Your website builder/CMS does not yet support the Google tag (gtag.js)
- You or your web developer are manually tagging your website
- Your website is tagged with analytics.js
- You use Google Tag Manager
Option 1: Install with a website builder or CMS
If you manage your site using one of the platforms listed on the Installation instructions page, select your platform and follow the instructions to finish setting up your Google tag without making changes to your code.
If your platform doesn’t yet support the Google tag, you can use the manual installation option (below).
Option 2: Install manually
Choose this option if one of the following is true:
-
-
-
- Your website builder/CMS does not yet support the Google tag (gtag.js). Note: You’ll need to use your platform’s custom HTML feature
- You or your web developer are manually tagging your website
Your website is tagged with analytics.js - You use Google Tag Manager
-
-
How to manually install the Google tag
On the Install manually tab, you’ll see the JavaScript snippet for your Google tag. Copy and paste your entire Google tag in the code of every page of your website, immediately after the <head> element.
Your Google tag is the entire section of code that appears, beginning with:
<!– Google tag (gtag.js) –>
and ending with
</script>
Next steps with your GA4 setup
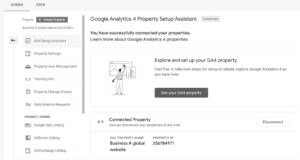
After you’re done with the wizard, you’ll see “You have successfully connected your properties” at the top of your Google Analytics 4 Property Setup Assistant page.If your Universal Analytics property name is “Example property (UA-nnnnnnn)”, your GA4 property name will be “Example property – GA4 (xxxxxxx)”, without a “UA-” prefix, and where xxxxxxx is a new property number.
We will continue with GA4 Configuration in the next post.
Dream Warrior Group, a Los Angeles Based web design and digital marketing Company, providing solutions for your online marketing needs. Our expertise includes Search Engine Optimization (SEO), Social Media Posts & Marketing & Google PPC campaigns. Call us now at 818.610.3316 or click here.


