
GA4 Configuration
Part 3 of many about GA4 and what is coming after UA
This installment of the Analytics after UA deals with detailed work you need to do to ensure you have completed the basic setup of GA4 by performing a proper GA4 configuration. We will pick up here at the end of the last article:
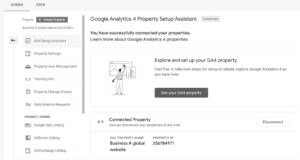
Next steps with your new GA4 property
After completing the process with the wizard, you’ll see “You have successfully connected your properties” at the top of your Google Analytics 4 Property Setup Assistant page. If your Universal Analytics property name is “Example property (UA-nnnnnnn),” your GA4 property name will be “Example property – GA4 (xxxxxxx)”, without a “UA-” prefix, and where xxxxxxx is a new property number.
Set up the GA4 Configuration tag
Step 1: Create a GA4 Configuration tag
Start by creating a Google Analytics: GA4 Configuration tag to send data to your Analytics property.
-
-
-
-
- In Google Tag Manager, click Tags > New.
- Enter a name for the tag at the top (e.g., “GA4 Configuration – example.com”).
- In the Tag Configuration box, select Google Analytics: GA4 Configuration.
- Configure your tag:
- In the field Measurement ID, enter your “G-” ID. Keep the Send a page view event when this configuration loads option checked to automatically send page view events.
- Optional settings:
- Server-side tagging: Select Send to server container to send all GA4 events to a Tag Manager server container instead of Google Analytics. Specify the Server Container URL of your Tag Manager server container. Learn more about Server-Side Tagging.
- Parameters: Add any parameters you’d like to configure in Fields to Set. Use recommended event parameter names so that Google Analytics can populate dimensions and metrics for you.
Example 1: To set a user ID, add a row to Fields to Set. Set the Field Name to user_id, and the Value to a Tag Manager Variable that returns the user ID.
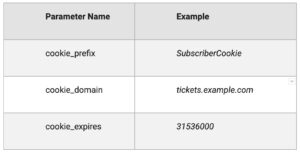
- Example 2: Use Fields to Set to configure cookie field settings:

- Custom properties: Add any custom user properties that you’d like to configure in User Properties.
Note: Analytics automatically collects some user dimensions so you don’t have to define user properties for them. You can set up to 25 additional user properties per Google Analytics 4 property.
-
-
-
Step 2: Create a trigger
Next, set up a trigger to load the Google Analytics: GA4 Configuration when someone loads your website.
-
-
- To ensure that the Google Analytics 4 Configuration tag fires before other triggers, click Triggering and use the Initialization – All pages trigger. Learn more about Page triggers.
- Save the tag configuration.
-
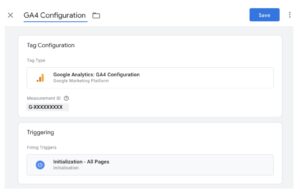
Result
Your tag configuration should look like this:
Step 3: Verify your tag works
To make sure your tag works as intended:
-
-
- In Google Tag Manager, click Preview. The Tag Assistant opens.
- Enter your site’s URL.
- Check if the Google Analytics: GA4 Configuration fired when the page loaded.
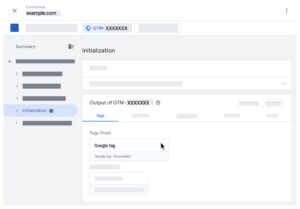
✅ If your tag fired successfully, the Tag Assistant UI look like this:❌ If your tag didn’t fire, check your tag’s trigger settings. - When you are done with debugging, close Preview mode.
- In your Workspace, click Submit to publish your changes.
-
Set up events
To set up an event using Google Tag Manager, you will configure a Google Analytics: GA4 Event tag and then create a trigger that specifies when you want to send the event.
The following steps show you how to send a custom event to a Google Analytics 4 property when a user clicks a button to sign up for your newsletter. The steps show you how to implement the event using Tag Manager and don’t require you to implement a data layer object.
Step 1: Create a GA4 Event tag
Start by creating a Google Analytics: GA4 Event tag for the new custom event.
-
-
- In Google Tag Manager, click Tags > New.
- Enter a name for the GA4 Event tag at the top (e.g., “GA4 Event – Signup newsletter”).
- Select Google Analytics: GA4 Event.
- In the Configuration Tag, select your Google Analytics: GA4 Configuration tag.
- In Event Name, enter a name for the event (e.g. signup_newsletter). This will create a new custom event and the name will appear in your GA4 reports. To create a recommended event, use one of the predefined event names.
-
Step 2: Create a trigger
Next, create a trigger to send the event when someone clicks the button.
-
-
- Click the Triggering box in your GA4 Event tag.
- Click + on the top right.
- Enter a name for the trigger (e.g., “Trigger – Signup newsletter”).
-
You can choose the conditions for sending the event. The following example sends the event based on the button label:
-
-
- Click the Trigger Configuration box in your trigger.
- Choose All Elements.
- Click Some Clicks.
- Set the following trigger condition: “Click Text contains Sign up for the newsletter”.
- Save all your changes.
-
If you want the event to trigger when someone views a page (e.g., on a confirmation page), you could use a Page View trigger instead.
Step 3: Preview your changes
Before you publish your new event in Tag Manager, click Preview to see the data that’s recorded when you click the “Sign up for the newsletter” button.
You can use preview mode to test changes to your container before you publish those changes to your website.
See your events in Analytics
You can see your events and their parameters using the Realtime and DebugView reports. Note that the DebugView report requires some additional configuration before you can use the report.
Dream Warrior Group, a Los Angeles Based web design and digital marketing Company, providing solutions for your online marketing needs. Our expertise includes Search Engine Optimization (SEO), Social Media Posts & Marketing & Google PPC campaigns. Call us now at 818.610.3316 or click here.